| ⏱ Prep Time 10 min + soak | ⚡ Blend Time 5 minutes | 🥣 Yield 4–6 servings | 📊 Difficulty Very Easy |
Hummus is not Emirati. It has never been Emirati. Its first recorded reference appears in a 13th-century cookbook attributed to Aleppo historian Ibn al-Adeem, making Syria its most credibly documented origin. From the Levant it spread across the Arab world — Lebanon, Palestine, Jordan, Egypt — each country developing its own version with different tahini ratios, different garlic levels, different textures. And then it came to Dubai.
What Dubai did with hummus is what Dubai does with every food it receives: absorb it, concentrate it, and serve it better than almost anywhere else. The Lebanese, Syrian, and Palestinian communities that arrived in the UAE from the 1960s onwards brought their kitchens with them, and the hummus that exists in Dubai today represents the full breadth of Levantine regional variation in a single city.
Depending on where you go, you can experience the traditional Lebanese Beiruty style topped with fresh cumin and parsley, the Palestinian variation rich with pine nuts, tart pomegranate molasses, and olive oil, or the classic Syrian version prepared using traditional, decades-old techniques.
This is the recipe for making that quality at home. Not the grainy, bland result you get from supermarket tubs. Not the dense, heavy paste that most home recipes produce.
This is the genuinely silky, pale, almost cloud-like hummus made by seasoned cooks who rely on quality chickpeas, aged olive oil, and dried varieties soaked overnight. The technique in this Hummus Recipe is specific, the ingredient ratios are precise, and once you understand the three secrets behind the texture, you will never need a store-bought alternative again.
🧆 The Three Secrets of Restaurant-Quality Hummus 1. Tahini goes in FIRST, emulsified alone with lemon juice before the chickpeas are added. 2. Ice cubes go in while blending — the cold shocks the fats in the tahini and whips air into the mixture. 3. You blend for far longer than you think is necessary — 4 to 5 full minutes, not 30 seconds. These three steps are what every Lebanese restaurant in Dubai does and most home recipes omit.
Related : Regag Recipe – Authentic Emirati Paper-Thin Bread — Complete Guide with Fillings
Hummus in Dubai: A Levantine Dish in a Gulf City
The word hummus (حمص) simply means chickpeas in Arabic — hummus bi tahini is the full name of the dip, meaning chickpeas with tahini. It is one of the oldest continuously prepared dishes in the Arab world, with versions documented across the Levant, Egypt, and Turkey over centuries of shared culinary culture. While debate often surrounds its exact origin, food historians trace the dish unambiguously to the broader Levant, with Syrian and Lebanese versions representing the oldest continuous traditions.
In Dubai, hummus arrived with the Levantine communities who formed the backbone of the city’s commercial sector from the 1960s onwards. Lebanese traders, Syrian merchants, and Palestinian professionals all brought their home recipes and eventually their restaurants. By the 1990s, every Arabic restaurant in the city served hummus as a mezze staple. By the 2010s, dedicated hummus restaurants had opened. Dubai has some of the finest hummus outside the Levant — and a population from over 200 nationalities who have collectively developed an extremely well-calibrated palate for the dish.
The standard of hummus in Dubai is genuinely high. The Lebanese style tends toward a tahini-forward version with bright lemon and relatively mild garlic. The Syrian style uses a thicker, smoother base with a more pronounced chickpea character. The Palestinian tradition is more generous with the toppings, incorporating pine nuts, pomegranate molasses, and olive oil that pool beautifully in the well pressed into the surface. All of these styles are worth eating, and all of them are worth understanding before you make your own.
Hummus Recipe – Ingredients
Five ingredients. That is all authentic hummus requires. The quality of each one determines the quality of the result more directly than in almost any other recipe — there is nowhere to hide a bad tahini or a watery lemon behind other flavours. Buy the best you can.

| Ingredient | Quantity | Notes — Quality Matters Here |
| THE HUMMUS | ||
| Dried chickpeas | 250 g (or 2×400g cans, drained) | Dried and cooked from scratch gives a significantly better flavour and texture. Canned works well for a quick version. See notes below. |
| Baking soda (for cooking dried chickpeas) | 1 tsp | Added to the cooking water; softens chickpeas dramatically and is the professional secret to ultra-smooth hummus |
| Premium tahini | 120 ml (½ cup) | The most important ingredient after chickpeas. Use Al Alwazah (Lebanese, available at UAE supermarkets), Al Yaman, or Al Kanater. Avoid budget brands — they taste bitter and gritty. |
| Fresh lemon juice | 3–4 tbsp (about 1.5 lemons) | Freshly squeezed only. Bottled lemon juice produces a flat, chemical note that cannot be hidden in a dish this simple. |
| Garlic | 1–2 cloves | Grated to a paste, not minced. Start with 1 clove; add more after tasting. The garlic should whisper, not shout. |
| Fine sea salt | 1 tsp (adjust to taste) | Added during blending; taste and adjust — chickpeas absorb salt differently depending on how they were cooked |
| Ice cubes | 3–4 cubes | The texture secret. Added while blending; whips air in and cools the tahini fats simultaneously. |
| FOR SERVING — THE DUBAI WAY | ||
| Extra-virgin olive oil | 2–3 tbsp | Drizzled generously; use Lebanese or Palestinian EVOO for authenticity. Must be good quality — it sits on the surface. |
| Whole cooked chickpeas | 1 tbsp | Reserved from the batch; placed in the centre of the bowl |
| Sumac | ½ tsp | The most common garnish in Dubai Lebanese restaurants; tart and lightly floral |
| Paprika (sweet or smoked) | A light dusting | Adds colour contrast; use smoked for a deeper flavour |
| Fresh parsley, finely chopped | 1 tbsp | The green element; always added fresh, never dried |
| CHOOSE YOUR DUBAI-STYLE TOPPING | ||
| Option A — Lebanese Beiruty | Pine nuts fried in butter + cumin | Al Safadi style; the cumin adds a warm earthy note |
| Option B — Palestinian Style | Pine nuts + pomegranate seeds + EVOO | Mama’esh style; sweet-tart contrast from the pomegranate |
| Option C — Syrian Style | Warm chickpeas + cumin + EVOO | Al Hamidieh style; simple, protein-rich, deeply satisfying |
| Option D — With Meat (Hummus Bi Lahme) | Spiced minced lamb + pine nuts + EVOO | The full meal version; served at Al Safadi and Al Mandaloun |
Related : Authentic Karak Chai Recipe: Dubai’s Beloved Tea Tradition (5 STEPS)
Dried vs. Canned Chickpeas: The Honest Comparison
Dried chickpeas soaked overnight and cooked from scratch produce far better flavor, a lighter color, and a significantly superior texture.
The secret lies in total control over the cooking process. To achieve an ultra-smooth blend, the chickpeas must be cooked until they are completely tender and practically falling apart. A classic Levantine technique involves cooking the dried chickpeas with a pinch of baking soda. This raises the pH level of the water, which breaks down the pectin and softens the skins and interiors simultaneously.
While canned chickpeas are perfectly acceptable for a quick weeknight option—just drain, rinse, and blend—they will naturally yield a denser texture. However, even a quick homemade batch using canned chickpeas is still vastly superior to any store-bought, mass-produced tub.
How to Cook Dried Chickpeas Properly (The Foundation)
Skip this section if using canned chickpeas. If using dried — which produces the best hummus — this step takes 10 minutes of active work the night before and completely determines your final texture.
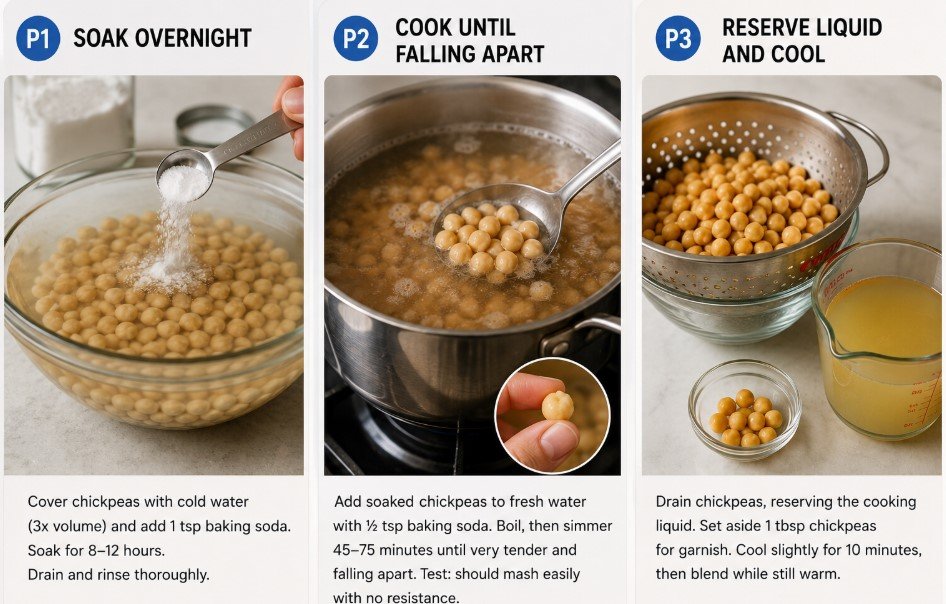
| P1 | Soak Overnight Place the dried chickpeas in a large bowl. Cover with at least three times their volume of cold water. Add 1 teaspoon of baking soda to the soaking water. Leave for 8–12 hours. The chickpeas will roughly double in size. The baking soda begins breaking down the pectin in the chickpea skins — this is not optional for hummus; it is what makes the difference between smooth and grainy. Drain and rinse thoroughly before cooking. |
| P2 | Cook Until Falling Apart Place the soaked, drained chickpeas in a large saucepan. Cover with plenty of fresh cold water. Add another ½ teaspoon of baking soda to the cooking water. Bring to a boil, skim any foam. Reduce to a steady simmer and cook for 45–75 minutes until the chickpeas are completely tender and beginning to fall apart — significantly softer than you would cook them for a stew. Test by pressing one between your fingers; it should offer no resistance at all. Hard chickpeas produce grainy hummus regardless of how long you blend them. |
| P3 | Reserve Liquid and Cool Drain the chickpeas, reserving the cooking liquid (aquafaba) separately. Reserve a tablespoon of whole chickpeas for garnish. Allow the drained chickpeas to cool slightly — 10 minutes — but blend them while still warm, not cold. Warm chickpeas blend more smoothly than cold ones because the starches are still gelatinised and fluid. If using canned chickpeas, you can warm them briefly in their liquid for 3 minutes before draining. |
The Hummus Method: Five Steps, Four Minutes
The method has been refined by Lebanese restaurant chefs across Dubai and Beirut into a specific sequence: emulsify the tahini first, add the chickpeas, then the ice. The sequence is not arbitrary — each step builds on the previous one to create a stable emulsion rather than a blended mixture.
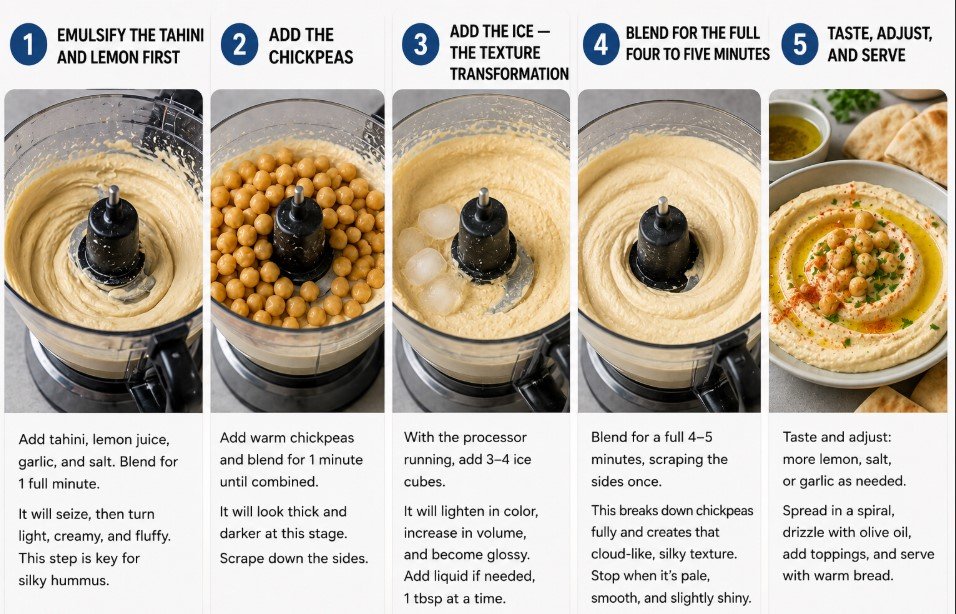
| 1 | Emulsify the Tahini and Lemon First This is the step most home recipes skip and the one that matters most. Place the tahini, lemon juice, garlic paste, and salt in the food processor. Blend for 1 full minute before adding anything else. The tahini will seize up initially — it will look thick and pale — and then, as the lemon juice’s acid interacts with the sesame fats, it will transform into a lighter, fluffier, almost whipped consistency. Blending tahini and lemon before the chickpeas prevents the dreaded gritty texture that comes from tahini particles that never fully emulsify when everything is added simultaneously. |
| 2 | Add the Chickpeas Add the warm chickpeas to the food processor with the emulsified tahini base. Blend for 1 minute until the mixture is combined. At this stage the hummus will look thicker and a slightly darker colour than the finished product — this is correct. Scrape down the sides of the bowl with a spatula. |
| 3 | Add the Ice — The Texture Transformation With the food processor running, add 3–4 ice cubes through the feed tube. The effect is immediate and dramatic — the mixture will lighten in colour, increase in volume slightly, and develop a glossy, almost luminous quality. The cold temperature shocks the fat in the tahini, causing it to stiffen slightly and trap air, while simultaneously whipping the mixture to a texture that no amount of room-temperature blending achieves. If the hummus seems too thick after the ice melts, add reserved chickpea cooking liquid (or cold water) one tablespoon at a time. |
| 4 | Blend for the Full Four to Five Minutes Continue blending for a full 4–5 minutes total — including the time with the ice. Scrape the sides once halfway through. Most people stop at 30–60 seconds and wonder why their hummus is grainy. The extended blending time fully breaks down remaining chickpea cell walls and achieves the complete emulsification that gives professional hummus its cloud-like texture. The hummus is ready when it is uniformly pale, silky, and holds a slight sheen when you run a spoon through it. |
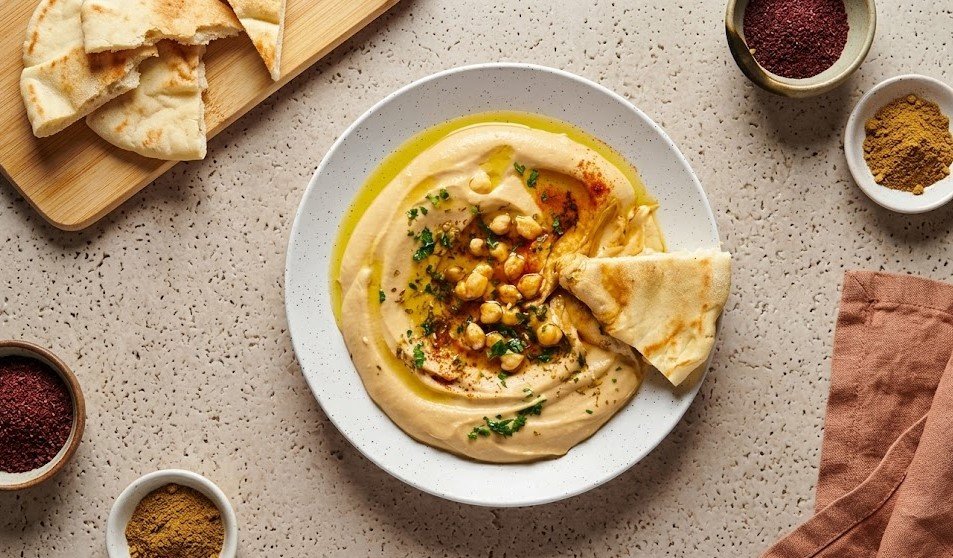
| 5 | Taste, Adjust, and Serve Taste the hummus carefully. It should be tangy from the lemon, nutty from the tahini, and have a background garlic warmth — all three in balance. If it tastes flat, add more lemon juice. If it is too sharp, add a pinch of salt. If the garlic is too aggressive, it cannot be reduced — note for next time to start with 1 clove. To serve: spoon onto a flat plate and use the back of a spoon to spread outward in a spiral motion, creating a well in the centre. Drizzle liberally with olive oil. Add your chosen toppings. Serve with warm Arabic bread (khubz) for dipping. |
The Three Techniques That Define the Result
Why the Skin-Peeling Step (Optional but Significant)
Chickpea skins contain the fibrous outer coat of the legume — perfectly edible, but slightly coarse. Peeling the cooked chickpeas produces the smoothest possible hummus — the method used by Lebanese and Syrian restaurant kitchens that take their hummus seriously. After cooking, place the warm chickpeas in a large bowl of cold water and gently rub them between your palms — the skins will float to the surface and can be skimmed off. You will not remove every skin. 70–80% is enough to make a noticeable difference. It takes 5–8 minutes. It is genuinely optional but the improvement in texture is real.
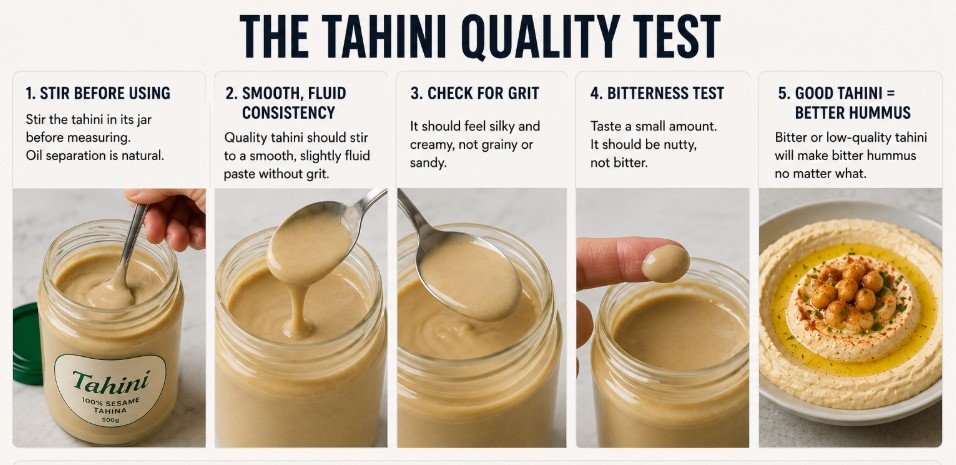
The Tahini Quality Test
Stir the tahini in its jar before measuring. Quality tahini (Lebanese and Palestinian brands are superior to most supermarket European versions) should stir to a smooth, slightly fluid paste without grit. If the oil has separated and the solid below it is very stiff, it needs more stirring. Bitter tahini — which you can taste on its own on a fingertip — produces bitter hummus that cannot be fixed by adding more lemon. Lebanese brands like Cortas, Al Yaman, or Al Alwazah are available at Carrefour, Spinneys, and LuLu Hypermarket in the UAE and are consistently excellent.
Room Temperature Serving
Hummus served cold from the fridge has a compressed, dense texture that does not represent the dish at its best. Remove from the fridge 20–30 minutes before serving. The hummus will loosen slightly and the flavours will open up. If it has thickened significantly in the fridge (overnight storage does this), stir in 1–2 tablespoons of cold water and mix well before transferring to the serving plate.
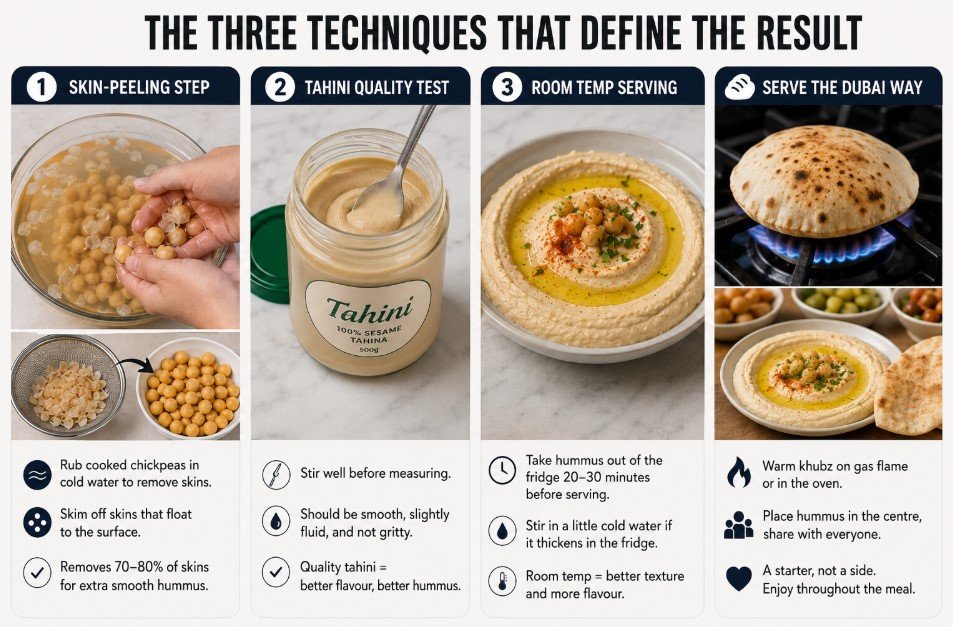
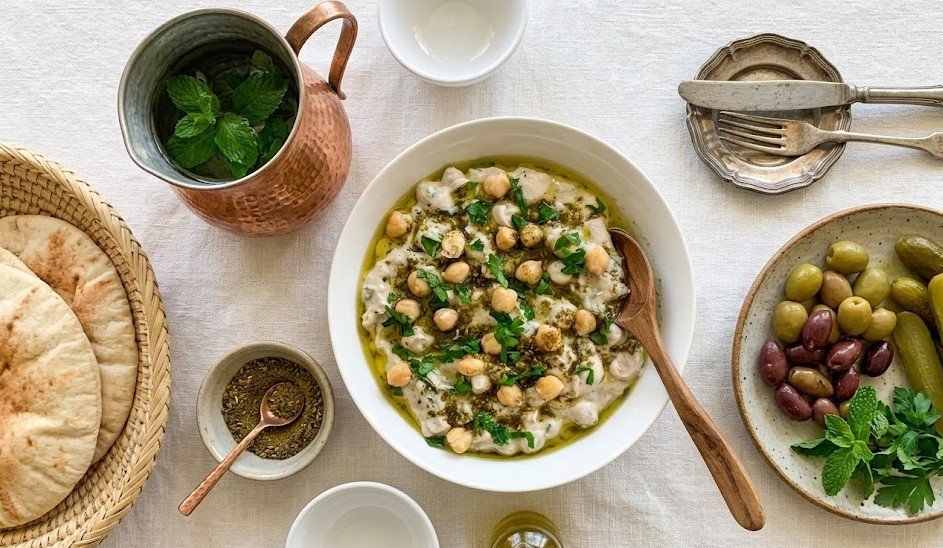
🍞 How to Serve Hummus the Dubai Restaurant Way Warm the Arabic flatbread (khubz) directly on a gas flame for 30 seconds per side until lightly charred and pliable, or wrap in foil and place in a 180°C oven for 5 minutes. Cut into wedges. Place the hummus plate in the centre of the table. In authentic Arabic restaurant culture, hummus is never a side dish — it arrives with the bread before anything else and is shared throughout the meal, not just consumed as a starter.
Dubai-Style Hummus Variations
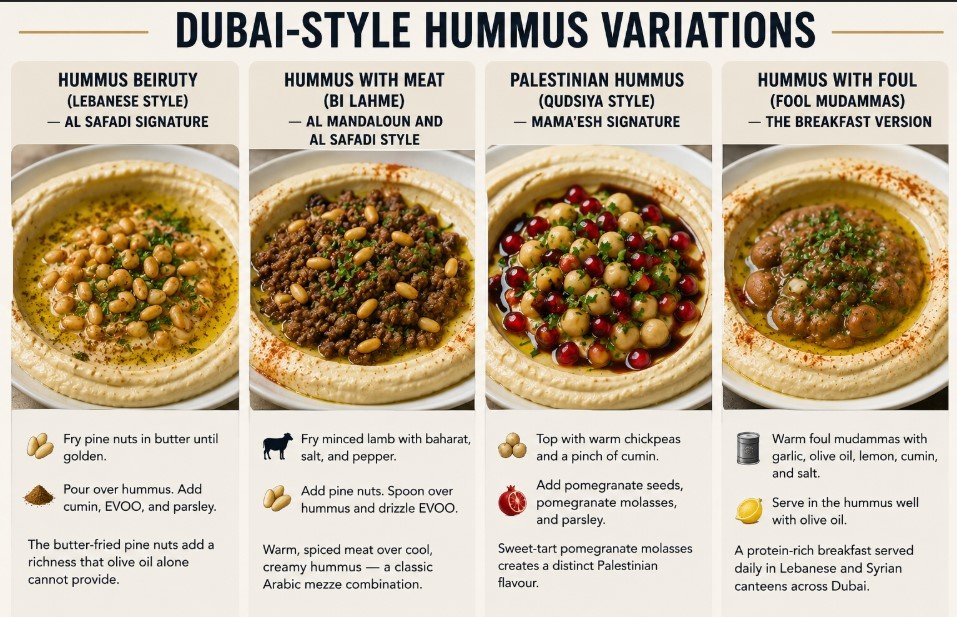
Hummus Beiruty (Lebanese Style)
This Lebanese classic elevates standard hummus with a rich, warm layer of flavor. The defining element is the use of butter-fried pine nuts, which introduces a distinct richness that olive oil alone cannot replicate.
- Toast the Pine Nuts: Fry 2 tablespoons of pine nuts in 1 tablespoon of butter until golden brown, watching closely as they color very quickly.
- Dress the Hummus: Pour the entire contents of the pan—both the toasted nuts and the warm, melted butter—directly into the well pressed into the surface of the hummus.
- Finish the Flavor Profile: Dust a generous pinch of ground cumin over the top, follow with a final drizzle of extra virgin olive oil, and scatter finely chopped fresh parsley across the dish.
- Layered Fats: Combining the rich, nutty notes of cooked butter with the bright, peppery notes of extra virgin olive oil creates a deeper flavor profile.
- Aromatic Balance: The earthy warmth of the ground cumin cuts through the richness of the tahini and butter, while the fresh parsley provides a crisp, clean contrast.
Hummus with Meat (Hummus Bi Lahme)
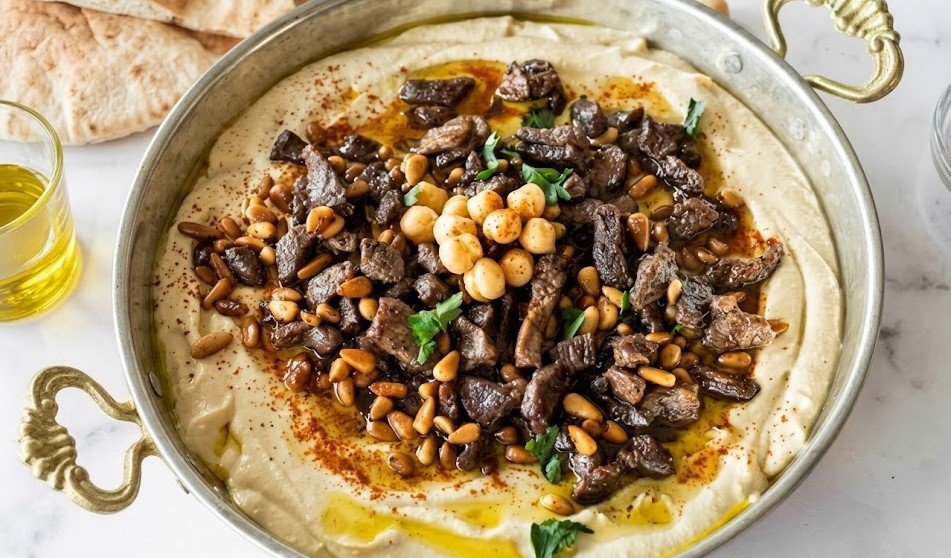
There is something incredible about the contrast between hot, spiced meat and a cool, creamy bowl of hummus. It’s easily one of the best combinations in Middle Eastern mezze culture, and it’s the exact dish that turns a simple dip into a satisfying, standalone meal.
- Sear the Lamb: Fry 150g of minced lamb in a hot pan with a teaspoon of baharat (Middle Eastern seven-spice blend), salt, and pepper. Let it cook until it is beautifully browned and slightly caramelized around the edges.
- Toast the Nuts: Toss a tablespoon of pine nuts directly into the pan with the meat during the last minute of cooking so they pick up the flavors and get golden.
- Assemble and Serve: Spoon the hot, spiced meat and pine nuts right over the center of the hummus, and finish it off with a generous drizzle of good olive oil.
Palestinian Hummus (Qudsiya Style)
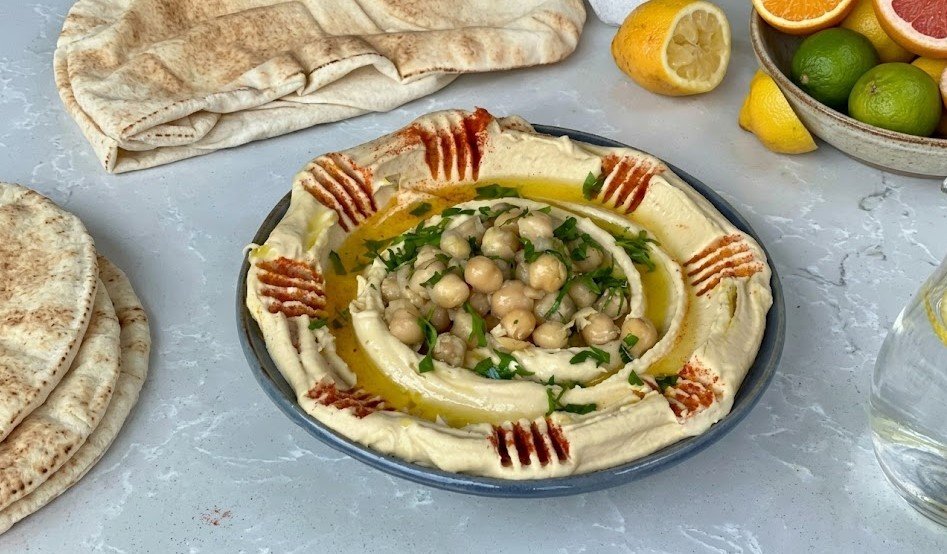
This is the most garnish-generous interpretation of the dish, defined by a vibrant mix of textures and a beautiful sweet-tart flavor profile that sets it completely apart from other regional styles.
- Prep the Base and Grains: Start with your standard smooth hummus base, then top it with warm, whole chickpeas tossed in a pinch of cumin for an earthy texture.
- Add the Toppings: Scatter a handful of fresh, bright pomegranate seeds and finely chopped parsley across the surface.
- The Critical Finish: Instead of sticking strictly to olive oil, drizzle a generous amount of pomegranate molasses over the top. The syrupy, tangy reduction cuts through the rich tahini base and completely changes the dimension of the dish.
Hummus with Foul (Mousabaha Style)
This is the ultimate protein-rich breakfast version of the dish, combining two staple favorites into a single, incredibly satisfying bowl. It is a morning tradition across regional breakfast canteens, keeping you fueled for hours.
- Prepare the Fava Beans: Warm a tin of foul mudammas (broad beans) in a small pot with a crushed garlic clove, a couple of tablespoons of olive oil, a squeeze of fresh lemon juice, cumin, and a pinch of salt until heated through.
- Layer the Flavors: Spoon the warm, savory bean mixture directly into the well pressed into the surface of your hummus, letting the flavorful juices pool over the smooth chickpea base.
- The Final Touch: Serve it warm with warm flatbread, a few fresh mint leaves, and some pickles on the side for a complete, traditional breakfast.
Troubleshooting
| Problem | Cause | Fix |
| Grainy texture | Chickpeas undercooked; short blend time | Cook chickpeas until falling apart; blend 4–5 min total with ice |
| Bitter taste | Low-quality tahini; too much garlic | Use Lebanese brand tahini; reduce garlic to 1 small clove |
| Too dense and stiff | Not enough ice water; over-chilled | Add more ice while blending; serve at room temp, not fridge-cold |
| Tastes flat and one-dimensional | Under-seasoned; poor lemon | Add more lemon juice first, then salt; use fresh-squeezed only |
| Garlic too aggressive | Too much; not rested | Reduce to 1 clove; make hummus 1–2 hours ahead so garlic mellows |
| Olive oil sinking into hummus | Hummus too warm; oil added too early | Cool 10 min before plating; drizzle oil just before serving |
Storage
Hummus stores well and many argue it tastes better on the second day after the flavours have had time to meld.
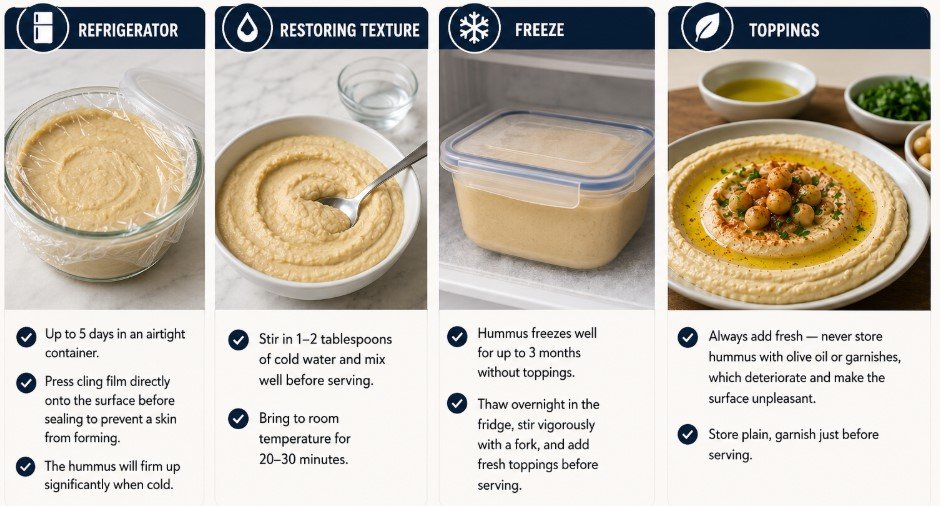
- Refrigerator: Up to 5 days in an airtight container. Press cling film directly onto the surface before sealing to prevent a skin from forming. The hummus will firm up significantly when cold.
- Restoring texture: Stir in 1–2 tablespoons of cold water and mix well before serving. Bring to room temperature for 20–30 minutes.
- Freeze: Hummus freezes well for up to 3 months without toppings. Thaw overnight in the fridge, stir vigorously with a fork, and add fresh toppings before serving.
- Toppings: Always add fresh — never store hummus with olive oil or garnishes, which deteriorate and make the surface unpleasant. Store plain, garnish just before serving.
| ✦ Hummus belongs to no single country and to everyone who has ever eaten it. In Dubai it arrived with the Lebanese merchants in the 1960s, grew with the city, and now represents the collective Levantine culinary inheritance of a place where those communities have made their lives. The recipe is the same one that was made in Aleppo and Beirut and Ramallah for centuries. The only thing Dubai added was a very high standard of expectation — which is, in the end, the best thing any city can contribute to a dish. |
Related : Camel Milk Ice Cream Recipe – Dubai’s Most Unique Dessert